Editor’s note: The plans for a sharpie sailboat, as outlined in the December 1930 and January 1931 issues of Yachting, look to us like a great project to teach the grandkids about boatbuilding! Some materials, costs, and methods have progressed since the time of writing, so instead of asking your plumber to cut pipe to just the right length and thread it, you may now be able to go down to Home Depot to find the bolt in question. Marine plywood may also be a good alternative to the wood listed.
Unfortunately, we are not all rich, and we can’t all build Cup defenders. But that is no reason for building a tub or staying ashore. There is always a way to beat the game, and the way to heath the boat game is to build a sharpie. You can do it for under forty dollars.
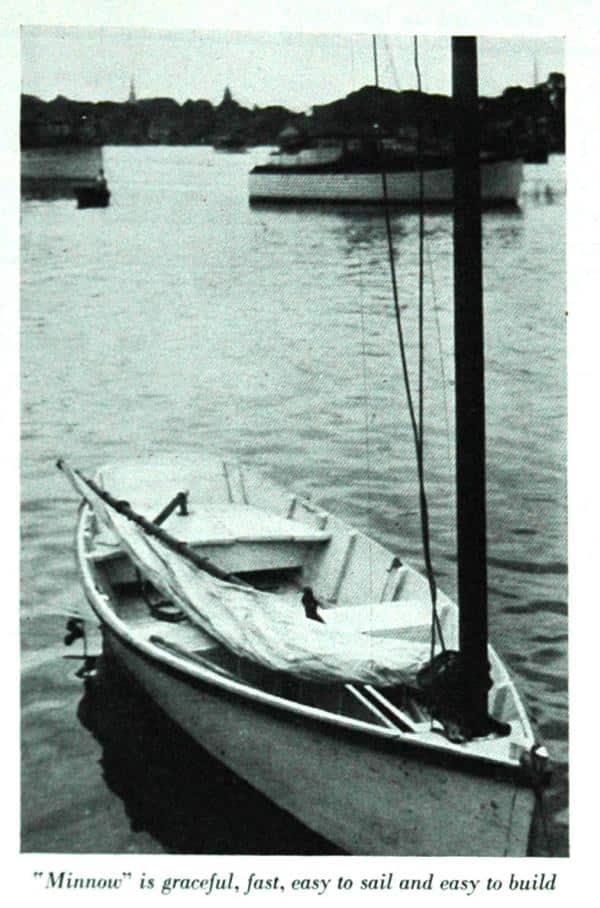
A sharpie represents the most boat for the money. It is graceful, fast, and a joy to sail. It is also eminently seaworthy and stiff. Minnow, fifteen feet over all, makes just over five knots under one reef and a strong wind. I have driven her with all sail in the same wind but I was too busy to do any timing – a considerably larger boat could not catch us.
A sharpie is easy to build. In general, the process is to bend two side boards around moulds, fasten them to stem and stern, screw in a chine batten, plank her crosswise, saw out the centerboard slot, and proceed with the finish (Detail J). If the pieces are carefully made, the process is really very simple. There is nothing that involves experience in boat building or special skill with tools. There are no pieces that go into place with difficulty or won’t stay put. I have built two of them single-handed with success.
Many times I have sailed among the big ships laid up in Oakland Estuary in my 18-footer, lying along the deck with one bare toe hooked carelessly over the tiller. With a gale it required at least two fingers – never more. She would come about like a top anywhere, any time. And one day we worked her up the Alameda Canal against a tide and sailed in San Leandro Bay when it blew in windows in “Frisco.” Add to this regular trips on Frisco Bay (it fairly blows your hair off there in summer) and a season on Monterey Bay, off Santa Cruz, and you have a fair idea of what an 18-footer will do.
I have built three sharpies, besides five smaller craft for fishing or hunting. At the age of nineteen I built the first one along the lines of a sketch my father had of a New Haven sharpie, eighteen feet long, dating from about 1880. The type was taken to the Carolinas from Connecticut by Mr. George C. Ives, and his son, Mr. John B. Ives, of Statesville, N.C., writes the following:
“Father had his sharpie built in 1875 at Fair Haven, Conn., by a famous builder. She was 36 feet long, having a fore and aft mutton leg sail with boom six to eight feet on the mast from the foot of the sail. This made the sail set like a board. This boat was tried out with the fastest boat then in the fleet and beat her. A club of gentlemen wanted to keep her at home and offered a bonus over cost, which father declined as he wanted the boat to pit against what North Carolina boatmen claimed for their clinker built boats which they considered superior.
“He brought two sharpies to North Carolina, and it was not many years till there was a big fleet of them in our waters. They built to 50 and 60 feet, the larger ones schooner rigged and decked, and this style is largely used now in the oyster dredging industry. The fishermen modified the style into deadrise skiffs, gaff sail and jib, and they carried sail like the wind and would almost go into the eye of it. The larger boats superseded the round bottom schooners in some industries, and would beat them in all weather at sea, but motor craft finally took their place.”
The design of a sharpie is a very particular affair. One was published around 1910 which brought down the scorn of my father. “Pumpkin seed,” he called it, for it was fat and flat, an it had a skeg, which would kill any real sharpie. In my first boat the side boards were sawed curved, starting from the bow. She rocked fore and aft too much and pounded in a chop. In the second one I started the curve farther aft, and it worked better, but they both dragged waves behind when going fast. When it came to Minnow I analyzed the design carefully, and I found that the best displacement curve came when the side boards were perfectly straight on both bottom and top, tapering, of course, from bow to stern. So I built her that way. She does not pound, drives to windward regardless of waves, and leaves the water nearly flat. Besides this, it makes building much simpler. So don’t let any wise friend persuade you to cut a curve on the bottom edge – you will get a perfect curve from the bending on the sides on the flare.
It is the experience of the author that textbooks tell you everything but how to get the monkey out of the box. It is the intent of this article to be brief, but comprehensive, covering all small points, even to nail sizes.
All the following directions are important. If you follow each step in its proper order, you will be surprised how quickly the boat will go together. But do not omit any steps or take any short cuts. Remember, a boat has a habit of leaking, even under the best of circumstances.
TOOLS
- cross-cut, rip, keyhole and hack saws
- drawknife
- spoke shave
- light plane
- hammer
- brace and bits 1/4″ to 3/4″
- screw driver bit and countersink
- twist drills 1/8″, 5/32″, 3/16″
- plain screw driver
- square, metal shears
- three clamps with 2″ openings

LUMBER
No list of pieces is given because one usually gets what is available. A few pieces are called for on the details, and if you don’t get enough lumber the first time, order again. Avoid spruce because it rots, and use regular 7/8″ boards, not thinner, to finish 13/16″. Never use tongue and groove boards below the water line. Planking should be 6″ wide.
HARDWARE
Hardware should be galvanized. Use 6 penny or 7 penny nails generally, wire rather than cut, with a few 8 penny. Two gross screws 1.5″ No. 10. Get some scraps of heavy galvanized sheet iron from your plumber.
CAULKING
Use regular stranded cotton caulking, or get balls of candle wicking from a hardware store. Cotton batting torn into strips will do in a pinch.
SIZE OF BOAT
A 15-foot boat will hold two men and a boy. It sails best with three boys or two men. An 18-foot boat holds four men but sails best with three.
COSTS
The materials for Minnow cost $45, with no attempt at economy, in 1929. A deck might add five dollars more. The 14-footer cost $20, in 1910. The 18-footer cost $35, in 1907. If you have $30, start work – you will raise the rest as you go along. Be careful of the dimes and quarters if cost is a problem. I have heard that in the Carolinas they used to build them for a dollar a foot plus materials. That, of course, could not be done now.
DIRECTIONS FOR WORK
In order of procedure.
MAIN ASSEMBLY
1. Have your saws sharpened by an expert, and sharpen your other tools.
2. Study the plans carefully. Every word and line is on there for business. On the plans certain pieces are identified where they occur, by a number in a circle.
3. Get pieces out at mill, and order lumber (Detail A). You can chop the stem out of an oak piece but don’t do it unless the mill man wants to rob you. They should be able to saw it out.Get a full width side board if you can afford it; mine was redwood. Otherwise, two 12” boards joined carefully as shown (Detail E). Making tight may be a nuisance, but the joint will only be under water when sailing, and slop comes aboard then anyway.

4. Finish side boards complete but do not cut at stern (Details D & E). Saw out as shown, mark for ribs, bore 5/32” for each screw, and countersink. Be sure to make sides opposite hand. Screw ribs in place by the gauge so chine will fit. Use screw driver bit and brace.
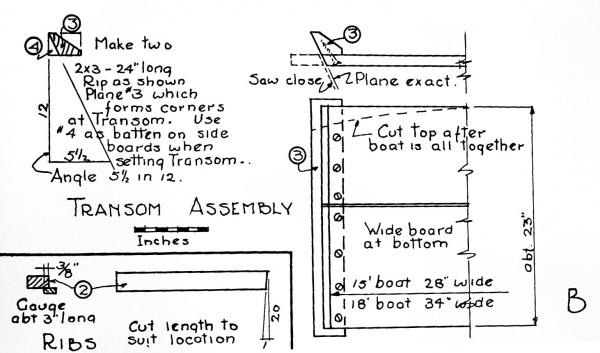
5. Make transom, leaving a wide board at the bottom. Stem is presumably made at the mill. (See detail B.)
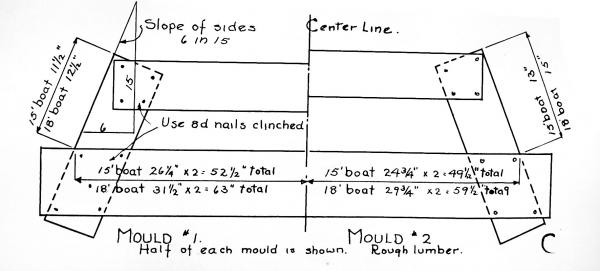
6. Make moulds of rough lumber (detail C).
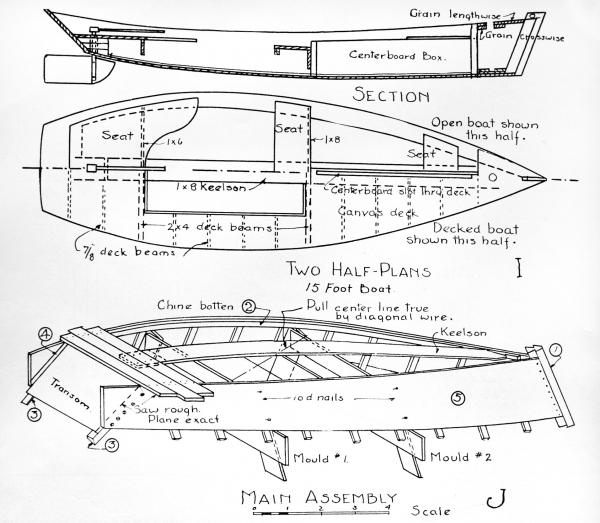
7. Form the boat upside down (detail J). Nail boat side boards securely to the stern. Nail to mould No. 2 with two 10 penny nails each side not driven home. Take rope hitch on after ends of boards and cinch in. Nail in form No. 1. Cinch up by twisting rope and draw tight over transom. The battens on the inside of side boards to set transom will help a lot. Screw transom in place, screws into corner piece rather than in end grain of boards of transom. Have transom extended beyond bottom edge of side boards for bevel planking.
The sides will not bend evenly. Pull the boat true with a diagonal wire or rope. Use a string down center for truing.
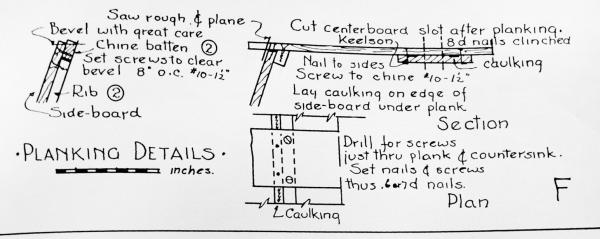
8. Spring chine battens into place with clamps, and screw, beginning at one end and working towards other. Screws go from outside of side boards through, as with ribs. Chine will project beyond edge of board 2/3″ so both will bevel for plank. (Details F, J, and Q.)
9. Bevel edges of side boards and chine exactly to take plank. Work on both sides at once and use strip across for guide. Work down with drawknife and plane carefully. Boat is apt to leak here. Bevel the transom. Cut stem so last plank will lap onto it and finish at line of rabbet. (Details M and N.)
10. Begin at stern and lay three planks. (Details F and J.) Be sure to lay a thin stir of caulking on edges of side boards under planks. Nail plank to sides and screw to chine as shown. Cut plank long and leave trimming till later to be done all at once. Do not lay too close – you want a crack to caulk into.
11. Start keelson at middle of second plank, and let it go loose at bow at first or nail to end of stem lightly. Fit it at bow when half the planks are on (detail J).
12. Complete planking. Watch caulking carefully, and lay it between plank and keelson on each side of centerboard slot (detail F). Saw plank as close to sides as you can without marking sides, and plane true.
13. Mark centerboard slot and saw accurately with cross cut saw through from the bottom. Should be 1.75” wide to take post.
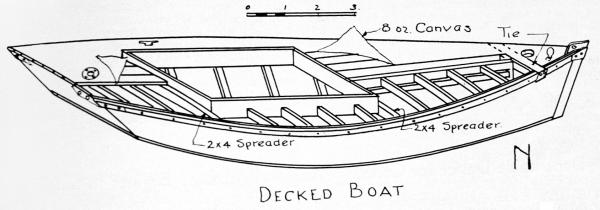
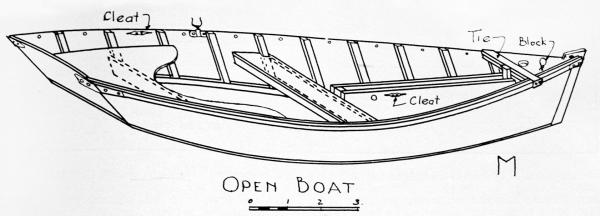
14. Turn boat right side up. Nail in spreaders to sides of ribs for open boat and 2×4 deck beams crowned for decked boat. Also seats. This holds the boat spread when the moulds are taken out, which is done now. (Details M & N.)
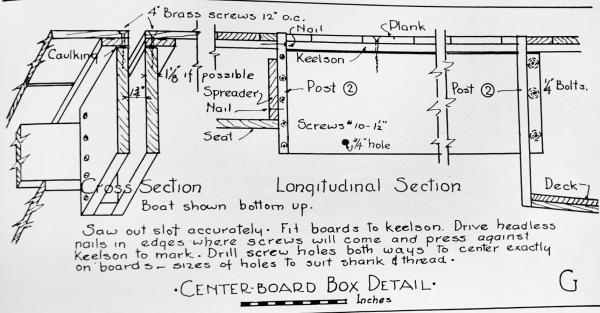
15. Centerboard box (detail G). Fit boards of box to keelson. They should be 1 1/8” thick, if possible but 7/8 can be used with care. It is almost impossible to drill for screw holes through from the bottom and run true into the boards of the box. It is better to drill both ways from the center, but the places must be accurately marked for the holes to meet. So drive some nails in the edges of the boards where the screws are to go, cut off the heads, and press down against the keelson. This will mark the holes, and you can bore the keelson from the inside through the plank, and into the edges of the boards. Use drill through bottom slightly smaller than shank of 4” brass screws, and a smaller hole in edges of boards to hold thread of screw.
16. Fit posts either end of slot, set in white lead, and nail into keelson with one eight penny. Clamp box to posts or nail lightly. Turn boat over and drive screws with brace and screw-driver bit. Be sure you have a thin strip of caulking between keelson and edges of box. Turn boat back, bolt box at bow with 1/4” bolts as there is no room to drive a screw (have holes already), and screw after ends to post, with 1.5” number 10 screws.
This completes the work on the rough hull. In the next issue of Yachting, directions and plans for completing the sharpie will be given in a second and final article (continued on the next page).
How to Build a Sharpie Part II
The Most Boat for the Least Cost
By EDWIN S. PARKER
From the January 1931 issue of Yachting.
In the December 1930 issue of Yachting, the plans and directions for building a 15-foot Sharpie were given that carried the work as far as planking the bottom. In the present article the directions for work are continued from that point to completion. Reference is made here to some of the sketches in the first article and it will be necessary to have them at hand for reference in reading this installment.
STEPPING THE MAST (Details I & Q)
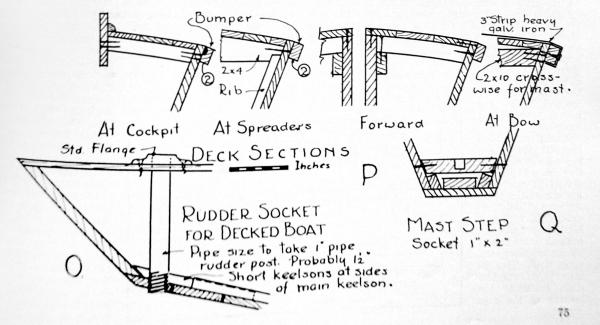
For open boat, build small decking in two layers, top running lengthwise, and lower running across to prevent splitting. Saw mast hole with keyhole saw. Nail this decking securely in place with eight-penny nails. But the strain on the mast is so great that it will spread sides. So later, when the bumpers are on, bend a 3-in wide strip of galvanised sheet metal, as heavy as you can handle, across and around the bumpers, screwing it with two screws each side — 2-in screws preferably—holes drilled in metal and wood. Put some extra screws through sides into bumpers just abaft this. The step is as detailed.
For the decked boat, put 2 by 10 boards across and fur up for crown of deck (Details N & P).
17. DECKING
Use 2 by 4 spreaders as already mentioned, crowned as much as you want. The crown is for appearance only. Nail the coaming to this, with
the 1 by 6 planking left over, and set in the other deck beams made of 7/8-inch stock, crowned likewise. The coaming supports the adjacent deck. Do not set the edge too high or it will cut one’s knees- two inches will stop
all the water necessary.
Use narrow matched boards for the deck -old flooring would be good. Another way is to have 7/8-inch boards ripped to 1.5-inch strips and bent to the curve of the boat, laying edge pieces first and working inwards, nailing together edgewise and into deck beams as well.
Paint deck a sloppy coat, lay canvas and tack to outside of side boards so that the bumper will conceal the edge of canvas. Paint canvas a sloppy coat at once. Use 8-ounce canvas if you can afford it, or anything lighter, down to unbleached sheeting.
18. BUMPERS (Details M, N & P)
In the open boat this strip strengthens the edge materially. In any case, it turns a lot of water on a rough day and takes the knocks when landing. Use the hard pine battens No. 2. Taper off the forward ends to about 3/4 of an inch on the inside. In the open boat, clamp in place and screw 8 inches o.c. from the inside of the side boards, as with ribs. In the decked boat, screw through bumper from outside into side boards, countersinking deeply. In either case, bind at bow and stem with galvanized iron to prevent spreading. Make patterns of heavy paper for cutting metal. Drill for nails in metal, and clinch nails where they go through boards.
19. CENTERBOARD (Detail K)
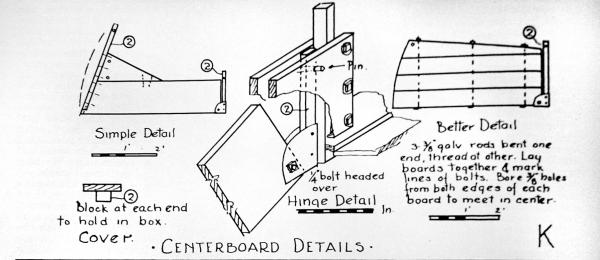
Make either way, as shown. The board can be pinned through the case for the hinge, as is usually done, but it is very convenient in a small boat to be able to get the board out from the top. The method of hinging shown has proved a good one, and keeps the pivot low. Have a hole in the box aft to take a pin to hold board down when sailing. Make removable cover to go on when board is down (Detail K).
20. RUDDER
This is of the balance type. A very small area forward of the post will balance a large area abaft it. Set post by trial if necessary. The detail shown is very cheap and very strong. Either type of socket is good, as shown (Details H & P). The pipe is better for the decked boat, while the built-up one will serve for the open boat, and is less expensive by perhaps a dollar. But have all the seams accessible in case the soft cloth between the pieces of wood does not make tight. This cloth can be slopped with paint when laying. To cut the hole for the post, use a gouge if you have no extension bit, and, in any case, cut through each piece as you lay it and set post in place when screwing down each piece to get hole true.
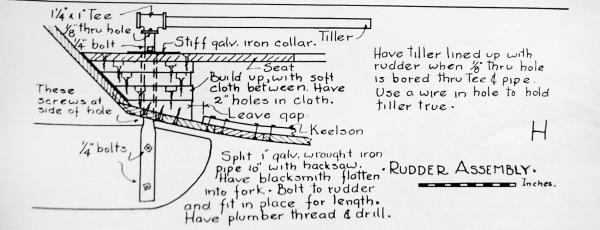
For the rudder post (Detail H) get a couple of feet or so of galvanized 1-inch genuine wrought iron pipe from the plumber’s scrap pile, hacksaw it down the middle, working from sides alternately to keep cut true. Cut down perhaps a foot. This is easy. Do not try to flatten it out cold, as it will split. Have the blacksmith heat and spread and drill for the 1/4-inch bolts. This should cost about 25 cents. Now set the rudder and bolts in place and, with this assembled, place the socket in the boat and mark the position of the bolt which holds the shaft from dropping out, and also place where the tee shall come for the tiller. Take to the plumber, who will cut the pipe, put a long thread on it, screw on a tee which has a larger opening horizontally than vertically – they come standard if you can find them – and with this tee lined up with the rudder so that the tiller will be true, drill a 1/8-inch hole clear through tee and shaft. Through this run a wire to prevent tee from rotating on shaft.
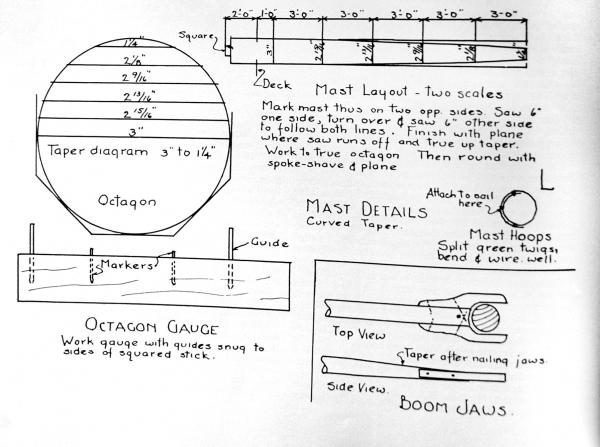
21. SPARS (Detail L)
Choose a clear, straight 4 by 6 to cut mast from, preferably western fir. Have mill cut to 3 by 3 and 2 by 2 (Detail A). Mark mast as in diagram… do not taper straight. Tack in brads at taper points, and spring the batten to get true curve. Saw to tapered square, working from both sides alternately to keep the lines, sawing perhaps 6 inches at a time on each side. Have the saw sharp. Where saw breaks out at edge, finish with plane – do no try to hew out, as the grain will tear in and leave a hollow in the mast. But work into a perfect squared stick. Make the octagon gauge, as shown. By twisting this as you go towards the small end you get a true octagon on the mast. cut to this line with drawknife and finish with plane. This will give a true octagon. If this is well done, the work of rounding off is negligible.
Bore hole 5/8 of an inch fore and aft at the head for halyard and work it out with knife so that rope will pass through easily.
Make boom similarly. Jaws of hard wood. The boom tapers very sightly at after end, and flattens out at forward end to take jaws. Make long in case sail stretches. (See detail L).
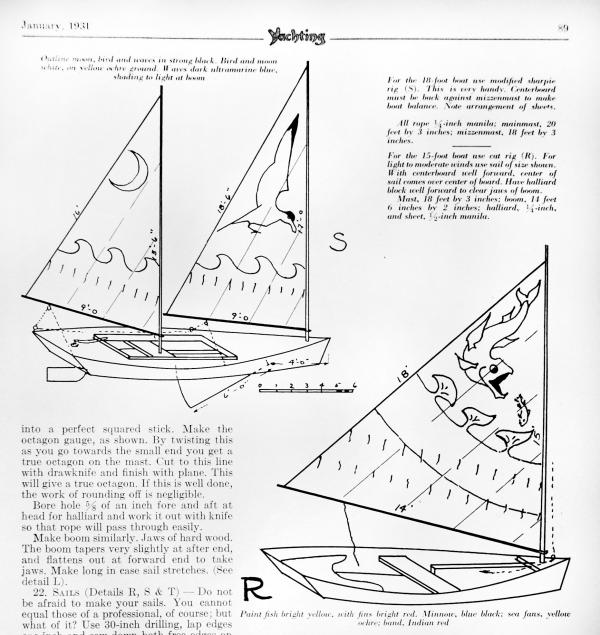
22. SAILS (Details R, S & T)
Do not be afraid to make your sails. You cannot equal those of a professional, of course; but what of it? Use 30-inch drilling, lap edges one inch and see down both free edges on a seeing mating, using number 30 thread and a long stitch and tight tension. Pin pieces together about one foot apart to be sure pieces pull alike. Lay the sail out with string on a large surface. Cut the sail to this pattern, selvage on the leach or rear edge, allowing hem at bias edges. Curve the edges you cut (at mast and boom) an inch or two out, especially on the edge next to the mast. Not too much, though, as the sail will bag. Hem bias edges, but leave selvage as is.
Have at hand a piece of 1/4-inch manila rope long enough to go around the edges of sail, with some to spare. Hang it out of doors for a month or more. Sew this to edges of sail with sail twine or knitting cotton, well waxed and double, with a sail needle or any heavy needle, the needle going under one strand of the top each stitch. This is the only tricky part of the process. If the rope is not tight enough, or rather, longer than the edge, the edge will flop curiously. If it is shorter than the edge, the sail will bag. To get even tension, lay sail out and stretch sail and rope together. Catch rope to sail every foot or so, and as you sew the rope on, come out even at each catching. The luff (at the mast) and the foot will be easy, but you may have to do the leach over again, as I did.
Sew on reef points of one-inch tape, 12 inches long, at each seam and two between. Make cover for sail so sun will not rot it.
23. CAULKING
In making a boat tight, plan for a good seam and fill it with caulking. The planks may be too close in some cases. Make a hard wood wedge and drive it all along the seam to open the seam slightly. Take the caulking, preferably stranded cotton, and drive it into the seam with the wedge or a putty knife, or at the ends of the seams, with a screw driver. Fill the seams evenly and fairly tight.
DO NOT drive caulking in seam at edges of bottom, between planking and side boards, that is, against mailings. The caulking will swell and pop off the planks. The caulking laid when planking should be sufficient. If leaks develop, fill with plenty of copper bottom paint.
Making tight is not easy. The bottom seldom gives trouble, but at the rudder socket and stern, and at all unexpected places, leaks show up and cause trouble. Make tight with caulking as far as possible. Then use white lead inside and out in corners, drying the boat before applying. A coat of paint does wonders, too, but all this should be done after the caulking is completed.
24. PAINTING
Paint inside, thinning for first coat.
Paint bottom with brown copper paint direct on the wood, giving two or three coats. Green looks better, but does not stay on as well.
Paint some kind of a design on the sail (Details R & S), using one-third or one-quarter oil and the rest turpentine. Outline design in black about one-half inch wide. Two are shown, but the possibilitics are endless.
25. MODIFYING THE DESIGN
It would be doubtful policy to modify the design of the hull. From Mr. Ives’ letter, it would seem that I have developed the design somewhat along the same lines us the fishermen did, namely, toward a dead rise skiff. The older sharpie had a long overhang aft, but actual analysis of the design does not favor this, and Minnow keeps going right into a sea, as the others did not. Do not put on a skeg, or change the rudder, for it is a joy to sail with the balanced rudder. The centerboard, however, may be moved forward or aft, at will, to suit any sail plan you may prefer.
Personally, I like the two masts on an 18-foot boat, though I never could bring myself to move the boom up the mast and reef along the mast as the old sharpies did. On my 18-footer I had a gaff sail forward, but the gaff was a nuisance. Do not have any stays on the mast – there is a tradition to the effect that the spring of the mast helps the speed.
A sloop rig should be good for the larger boats, but whatever rig is used, be sure the center of the total sail area comes over the center of the area of the centerboard.
If a boat larger than 18 feet is to be built, increase the depth of the side boards as well as merelY lengthening them, as shown, so there will be more freeboard aft.
26. GENERAL POINTS
It is well to have the boat decked – you can tip without taking water over the lee rail. A cover on the centerboard box is worth having. as water shoots up in a chop. For a small boat, though, the open model is very handy for rowing.
When sailing before the wind pull up the centerboard. One trial will show you why.
Do not use ballast and try to carry more sail- you lose thereby.
My father’s plan of 1880 is said to have steered with an oar. This should help in a race but I found it a nuisance.
Ready to get building? Click here for a printer-friendly PDF of all the instructions and diagrams. Then write to Yachting to share your experience!
Yachting would like to thank reader Fred Ganley for remembering this article and calling it to our attention. Happy building, Fred!